- August 29, 2024
- IT Castle
- Magento
The installation of 2.4.7 Magento on the Ubuntu 24.04 LTS (Linux) operating system will improve the performance and scalability of your magento 2 ecommerce site that you aims to develop. This new release also comprises various enhancements in quality and bug fixes, as well as updated core Composer requirements and external libraries that make it compatible with PHP version 8.2.
In this article I will guide you through the steps necessary to have Magento version 2.4.7-p2 opensource edition running on a clean installation of Ubuntu 24.04 LTS, enabling your ecommerce website to function more optimally and effectively.
Table of Contents
Install Apache2 Web Server on Ubuntu 24.04 LTS
Run System Updates:
Before starting, make sure your system is up to date. Update your repositories and upgrade any existing packages using the following command:
Install Apache2
Once your system is updated, install Apache2 by running the following command:
sudo apt update && sudo apt upgrade -y
sudo apt install apache2 -y
This command will install Apache2 and any required dependencies.
Start and Enable Apache2 Service
After installation, start the Apache2 service and enable it to start automatically on boot:
					sudo systemctl enable apache2
sudo systemctl start apache2
Verify Apache2 Installation
To ensure Apache2 is installed and running correctly, you can check its status:
sudo systemctl status apache2
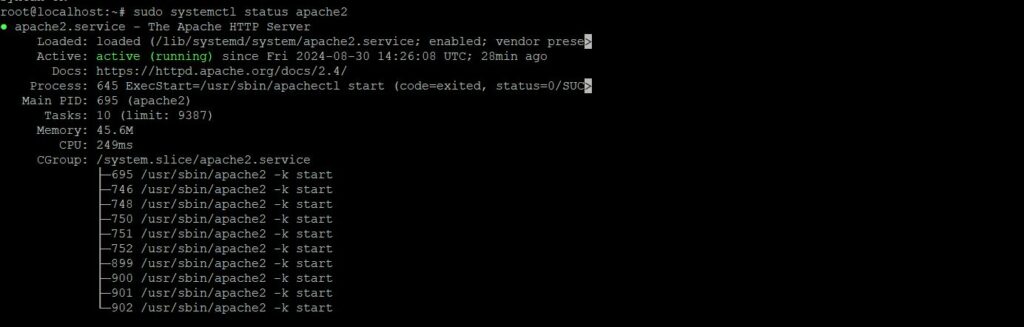
If Apache2 is running, you should see “active (running)” in the output.
Adjust Firewall Settings
If you have UFW (Uncomplicated Firewall) enabled, you’ll need to allow traffic on Apache’s default ports (HTTP and HTTPS). Run the following commands:
sudo ufw allow 'Apache Full'
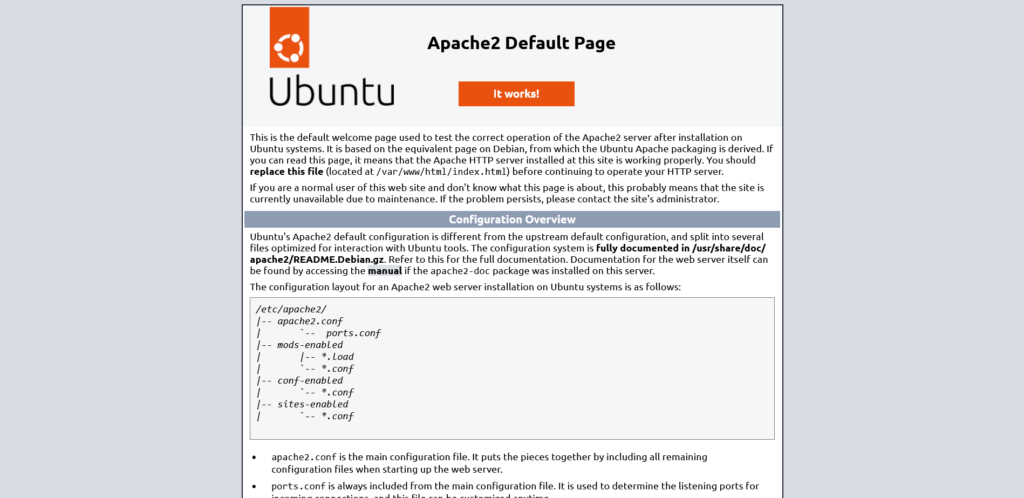
Test Apache2 Installation
To verify that Apache2 is working correctly, open a web browser and enter your server’s IP address in the address bar (e.g., http://your_server_ip). You should see the default Apache2 welcome page, confirming the installation was successful.
With these steps, you’ve successfully installed Apache2 on your Ubuntu 24.04 LTS system. You can now proceed to configure and host your websites.
Configure Apache2 & Virtual Host For Magento 2.4.7
We will use the default virtual host that are given while installing the appache2. If you want you can create a new virtual host file and activate that. Follow these steps to configure Apache2 and set up a virtual host for Magento 2.4.7 on Ubuntu 24.04 LTS:
Edit the Default Virtual Host Configuration
sudo nano /etc/apache2/sites-available/000-default.conf
Add the following content to the file, then save and exit:
					ServerAdmin webmaster@localhost
DocumentRoot /var/www/html/pub/

<Directory "/var/www/html">
    Options Indexes FollowSymLinks MultiViews
    AllowOverride All
</Directory>
- DocumentRoot: This should point to the
pub/directory of your Magento 2 installation. - AllowOverride All: This is necessary to enable
.htaccessfiles, which Magento 2 uses extensively for URL rewrites and other configurations.
Set the Global ServerName
To avoid any warnings about the server not being able to determine its fully qualified domain name (FQDN), set the global ServerName directive:
Open the Apache configuration file:
sudo nano /etc/apache2/apache2.conf
Add the following line at the end of the file, replacing 123.123.123.123 with your server’s IP address:
ServerName 123.123.123.123
Save the file and exit (Ctrl + x) the editor.
Enable Apache Modules and Test Configuration
Enable the mod_rewrite module, which is necessary for Magento’s URL rewriting:
sudo a2enmod rewrite
Test the Apache configuration to ensure there are no syntax errors:
sudo apache2ctl configtest
If the test is successful, you should see Syntax OK.
Finally, restart Apache2 to apply all the changes:
sudo systemctl restart apache2
The virtual host points to the pub/ directory, and mod_rewrite is enabled, ensuring proper handling of URL rewrites and other configurations needed for Magento.
How to Install PHP 8.2 on Ubuntu 24.04
Run System Updates:
Before starting, make sure your system is up to date. Update your repositories and upgrade any existing packages using the following command:
sudo apt update && sudo apt upgrade -y
Add Ondřej Surý’s PPA Repository
To install PHP 8.3 on Ubuntu 24.04, you need to add the Ondřej Surý PPA, which maintains the PHP repository. Use the following command to add it:
sudo add-apt-repository ppa:ondrej/php
After adding the PPA, update your repositories again:
sudo apt update
Install PHP 8.3 on Ubuntu 24.04
Now, you can install PHP 8.3 on your Ubuntu system by running:
sudo apt install php8.3 -y
Verify the installation and check the active PHP version with:
php --version
Install PHP 8.3 Extensions for Magento 2.4.7
To install PHP 8.3 along with the necessary extensions for Magento 2.4.7 on Ubuntu 24.04, use the updated command below:
sudo apt install php8.3 libapache2-mod-php8.3 php8.3-mysql php8.3-soap php8.3-bcmath php8.3-xml php8.3-mbstring php8.3-gd php8.3-common php8.3-cli php8.3-curl php8.3-intl php8.3-zip zip unzip -y
Configure the php.ini File
The location of the php.ini file depends on your PHP version and how it’s installed. For PHP 8.2, you can find the php.ini file using the following command:
php --ini | grep "Loaded Configuration File"
This command will output the path to the active php.ini file. Once you know the location, open the php.ini file in a text editor like Nano:
sudo nano /etc/php/8.3/cli/php.ini
(Note: Replace 8.3 with your actual PHP version if different.)
some common PHP settings that you may need to adjust for Magento:
- Memory Limit: Magento requires a higher memory limit minimum 2GB
- Max Execution Time: Set a higher limit to avoid timeouts during long operations.
- Max Input Time: Similar to max execution time, useful for scripts that take longer to process.
- File Uploads: Increase the maximum file size for uploads if needed. performance.
					memory_limit = 2G
max_execution_time = 1800
max_input_time = 1800
upload_max_filesize = 64M
post_max_size = 64M
Save and Exit After making the necessary changes, save the file and exit the text editor:
- Press
CTRL + Wto search. - Press
CTRL + Oto save. - Press
CTRL + Xto exit.
sudo systemctl restart apache2How To Install MySQL on Ubuntu 24.04
Install MySQL Server:
Magento 2.4.7 prefer mySql 8+, To Install MySQL server in ubuntu 24.04 using the following command:
sudo apt install mysql-server -y
Secure MySQL Installation
After the installation, it’s important to secure your MySQL server. Run the security script:
sudo mysql_secure_installation
You'll be prompted to configure some security options:
- Set a strong root password: You’ll be asked to create a strong password for the MySQL root user.
- Remove anonymous users: Choose “Yes” to disallow root login remotely.
- Remove test database: It’s a good practice to remove the test database.
- Reload privilege tables: Choose “Yes” to reload the privilege tables immediately.
sudo apt update
Create a Database for Magento
Now that MySQL is installed, you can log in to the MySQL root account using:
sudo mysql -u root -p
Create a new database and a dedicated user for Magento. Run the following commands in the MySQL shell:
					ALTER USER 'root'@'localhost' IDENTIFIED WITH mysql_native_password BY 'password';

CREATE DATABASE magento_db;

CREATE USER 'magento_user'@'localhost' IDENTIFIED BY 'your_secure_password';

GRANT ALL PRIVILEGES ON *.* TO 'root'@'localhost' WITH GRANT OPTION;

FLUSH PRIVILEGES;

EXIT;
- Replace
magento_dbwith your desired database name. - Replace
magento_userwith your desired username. - Replace
'your_secure_password'with a strong password.
Install and Secure phpMyAdmin on Ubuntu
Run the following command to install these packages onto your system. Please note, though, that the installation process requires you to make some choices to configure phpMyAdmin correctly. We’ll walk through these options shortly
sudo apt install phpmyadmin php8.3-mbstring php8.3-zip php8.3-gd php8.3-curl
How to install Elasticsearch
install Openjdk17 (Java):
Before starting, make sure your system is up to date. Update your repositories and upgrade any existing packages using the following command:
					sudo apt install openjdk-21-jdk -y

java -version
Install Elasticsearch 8 for Magento 2.4.7-p2
Download and import the Elasticsearch GPG key to verify the authenticity of the packages:
wget https://artifacts.elastic.co/GPG-KEY-elasticsearch -O /etc/apt/keyrings/GPG-KEY-elasticsearch.key
Add the Elasticsearch repository:
echo "deb [signed-by=/etc/apt/keyrings/GPG-KEY-elasticsearch.key] https://artifacts.elastic.co/packages/8.x/apt stable main" | tee /etc/apt/sources.list.d/elastic-8.x.list
Install Elasticsearch:
Update your package list and install Elasticsearch:
apt update & install elasticsearch
Start and Enable Elasticsearch:
					sudo systemctl start elasticsearch
sudo systemctl enable elasticsearch
Configure Elasticsearch for Magento 2.4.7
Magento requires certain configurations in Elasticsearch. Open the configuration file:
sudo nano /etc/elasticsearch/elasticsearch.yml
Set the following security option to false to disable the internal security features (Magento does not require them for catalog search):
xpack.security.enabled: false
Enable the id_field_data field by adding the following configuration to your elasticsearch.yml file and restarting the Elasticsearch 8.x service.
					indices:
  id_field_data:
    enabled: true
Restart the Elasticsearch service to apply the changes:
sudo systemctl restart elasticsearch.service
Verify Elasticsearch Installation
To ensure Elasticsearch is working correctly, run the following command: You should see a JSON response confirming Elasticsearch is running.
curl -X GET "localhost:9200/"
How to Install Composer 2.7
Composer is an essential tool for managing PHP dependencies, including Magento 2.4.7. Follow these steps to install Composer on Ubuntu.
Download Composer using this command:
curl -sS https://getcomposer.org/installer | php
Move the Composer file to the /usr/local/bin path:
mv composer.phar /usr/local/bin/composer
Grant Execute Permissions
sudo chmod +x /usr/local/bin/composer
Verify Composer Installation
Check if Composer is installed correctly by verifying its version:
composer --version
Output
					Composer version 2.7.9 2024-09-04 14:43:28
PHP version 8.3.11 (/usr/bin/php8.3)
Run the "diagnose" command to get more detailed diagnostics output.
Install Magento 2.4.7-p2 in Server
To install Magento 2.4.6, 2.4.7 it’s best to use the Magento Marketplace by generating an access key. This method ensures you’re pulling from the official repository, making the installation process smooth.
Generate Access Keys
Go to My profile > Marketplace > My Products > Access Keys to generate your Public and Private keys, which are needed for the installation process.
Download Magento 2.4.7-p2
Use the following Composer command to download Magento 2.4.7-p2 to your project directory /var/www/html/. Remember this directory needs to be empty. you may found index.html as default apache works. You need to delete this file Run rm index.html
composer create-project --repository-url=https://repo.magento.com/ magento/project-community-edition=2.4.7-p2 .
Move the Composer file to the /usr/local/bin path:
mv composer.phar /usr/local/bin/composer
Grant Execute Permissions
sudo chmod +x /usr/local/bin/composer
Verify Composer Installation
Check if Composer is installed correctly by verifying its version:
composer --version
Output
					Composer version 2.7.9 2024-09-04 14:43:28
PHP version 8.3.11 (/usr/bin/php8.3)
Run the "diagnose" command to get more detailed diagnostics output.